About this deal
When Starlink coverage is not as wide as needed, or there is a dire need to connect wired devices to the internet, the suitable Ethernet cable is the 23AWG CAT6/CAT6A cable, which contributes around 0.03 ohms per meter for a continuous run of data supply. Starlink Ethernet cables are built in a plug-and-play design allowing for direct connection. Below are steps to follow to connect your Ethernet cable to a Starlink router; Moreover, the tutorial is only applicable to those with a Gen2 dish, which is rectangular and not circular (like the one pictured below). That’s because the Gen1 router boasted an ethernet port. If I use the Ethernet adapter, can I turn off the wifi signal? I only want to use the ethernet so the wifi signal doesn’t interfere with other devices, etc.
The setup is simple and straightforward if you use the technical details in the Starlink app. The toughest part is simply finding a good spot to plug it in. Below are simple steps to set up your Starlink mesh Wi-Fi: But I’m not a businessman, don’t know the HFT or telecoms markets, and love to be educated by more knowledgeable internet commentators :)There is more than enough demand to make the service worth having even if eventually every static building has fast fibre and/or high speed cellular networking (which is never going to happen). The Starlink cable is not rated for burial, but you can enclose the Starlink cable in conduit if you are needing to bury the cable run from your installation location to your house. Conclusion Step 1 – Unplug the Starlink router AC power cord from the wall. You will want the dish and router turned off while we reconfigure the cables. While Starlink doesn't specify the exact range of its mesh nodes, the installation materials do advise that the nodes "work best when they're no more than one to two rooms apart from each other."
The junk that’s coming at earth comes in at such a high speed that it WILL burn up regardless. Satellites on low earth orbit need to be directed down so the parts would rain down where they won’t hit anyone or anything important. Even sprinkling bits of satellites over someone’s corn field is a bit of a no-no. I just say, all astronomy and space science and opinions in the world is not going to turn the money-machine around. Unfortunately!
Now that you have successfully connected the Ethernet Adapter to your device, you are ready to proceed to the next step, which involves configuring network settings if necessary. My suggestion would be to upgrade to the High Performance hardware, so you can ditch the Starlink router and Ethernet Adapter completely. The Standard hardware wasn’t designed for anything too advanced, and I wouldn’t be surprised if Starlink intentionally limited the Ethernet Adapter in some way. Most customers aren’t relying on 1 gig home networks, or really any task that would push the Ethernet connection beyond 100 mbps. Reply Not really how orbits work. Every change in the orbit requires a change in velocity (aka fuel shot out of an engine) and fuel is very limited when you’re a satellite. “Avoiding” key observations would either wipe out the satellites or wipe out ground coverage. The first step is cutting the proprietary connector off the Starlink ethernet adapter and adding a male RJ45 connector. But, because Starlink uses non-standard wiring, you have to wire this connector differently to normal, as shown in this photo + diagram. It is important to handle the Ethernet Adapter with care and avoid dropping it or exposing it to excessive moisture or extreme temperatures. Any physical damage to the device can affect its performance and may even render it unusable.
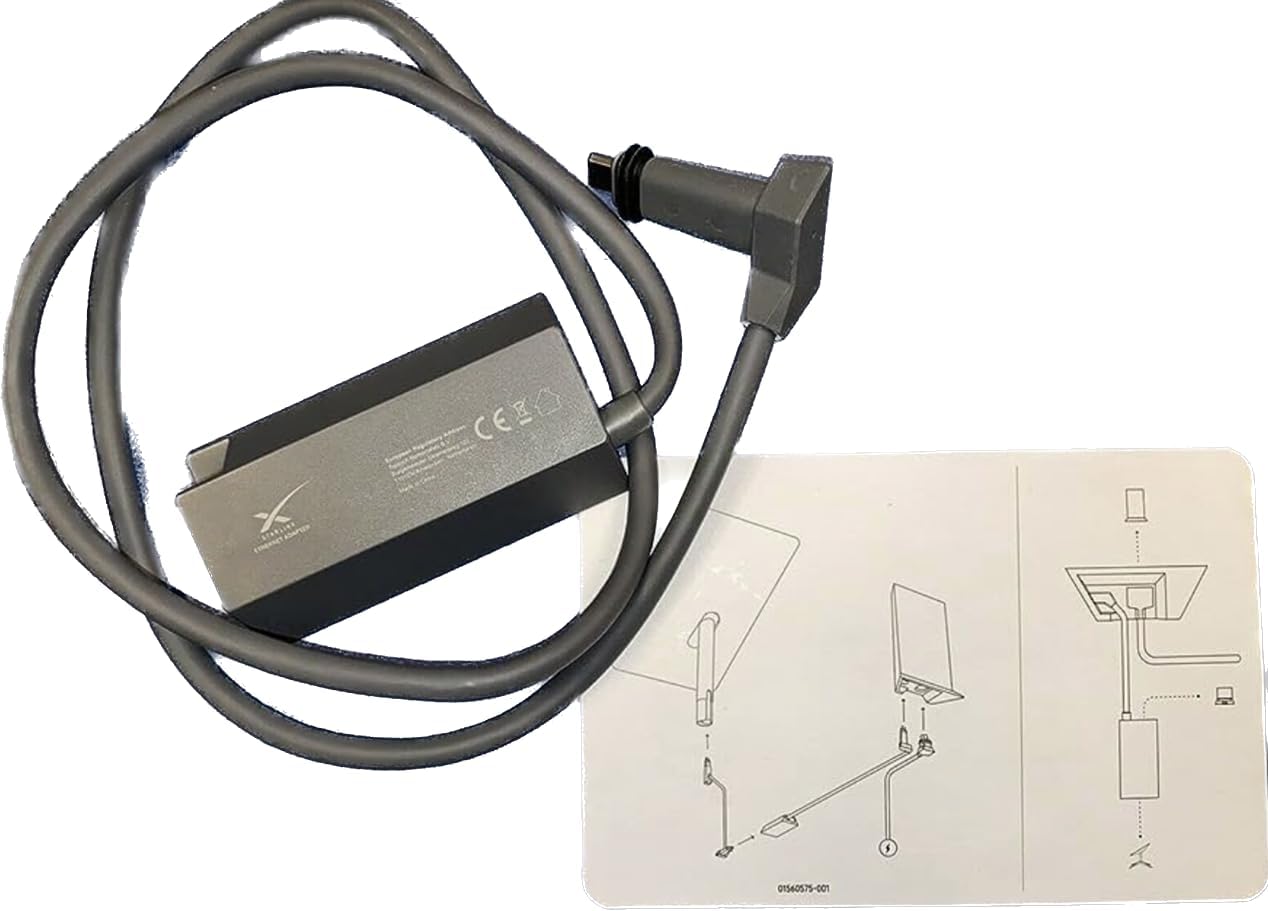
The Ethernet port adaptor combined with a regular antenna is intended for wired Ethernet end point such as PCs, laptops, cameras, etc. and leverages the existing Starlink Wi-Fi router network services such as NAT, DHCP, and DNS. If I place the existing Starlink Wi-Fi router in router bypass mode, I can connect a third party router to the Ethernet port adapter and can of course plug any client device I want into the third party router. Installing Starlink internet is straightforward and can be completed in just a few steps. In this guide, I will walk you through the steps required to get your new Starlink internet working. Then you can finally enjoy high-speed, low latency broadband internet at your home! I will also share some additional resources regarding Starlink accessories and permanent mounting options. this reply box doesn’t allow pictures, but I made a pretty one! — here’s a pasted table from Excel:
Starlink Pipe Adapter
Compare that to 8 big launches for the US military alone, plus maaany earth observation and communication launches. I don’t think the small-to-mid sized ground-based observatories I’ve ignored come even close to that kind of volume. There’s just not that many new ones being built. Actually, many are even being decommissioned as funding is limited and flows to the big toys rather than upkeep. (Which is a pity: myself I built my PhD on a 1.3m observatory. Good times.)
To connect the Ethernet cable to the Starlink router, you must plug one end of the cable into the Ethernet port on the router and the other end into the device you are connecting. This will establish a wired connection between the device and the router. Exactly how to connect an Ethernet cable to a Starlink router Yeah, that’s the big question IMO. According to [1] the dishy earth-space links run at 24 GHz. Trust me, even LEO link budgets at that frequency are pretty ugly due to not only rain, but clear-sky/cloud atmospheric losses too. That about wraps it up! Setting up Starlink is a straightforward process. Verify you have all the correct hardware, assemble the dish, plug everything in, and complete the setup in the Starlink app. As with adding your own router, you also have the option of connecting your Starlink system to a third-party Wi-Fi mesh system such as one of our top-rated ones listed below. Depending on your needs, any of these products can be a great alternative to Starlink's own mesh hardware.
Step 5: Troubleshooting Common Issues
The adapted is a networking accessory that facilitates the connection between the Starlink satellite dish and a Wi-Fi router. It enables the connection of wired network devices such as printers, making it an ideal solution for users looking to expand their network coverage and utilize advanced router features. The adapter can be used in conjunction with a separate router or mesh system to enhance coverage and increase internet access speed. Not surprised about power either – just look at how much your wifi router consumes to provide slower connection speed to one computer than to that same computer over Ethernet (remember to actually turn the wifi off on the router) at the small easily measured at home scale, this is the same problem but with far vaster distances and rapidly moving devices to make the comparison worse (though more directional antenna helps its got to stay on target). In the original design, “nine pieces of each Starlink satellite, including thruster parts, reaction wheels used for maneuvering, and silicon carbide communications components”, would have fallen all the way down. The new design replaces these with “less resilent materials”, but: Interesting. I don’t understand how they could fit in there all required signals. They need 18 pins at least.
 Great Deal